How to Customize Windows 11 Tutorial
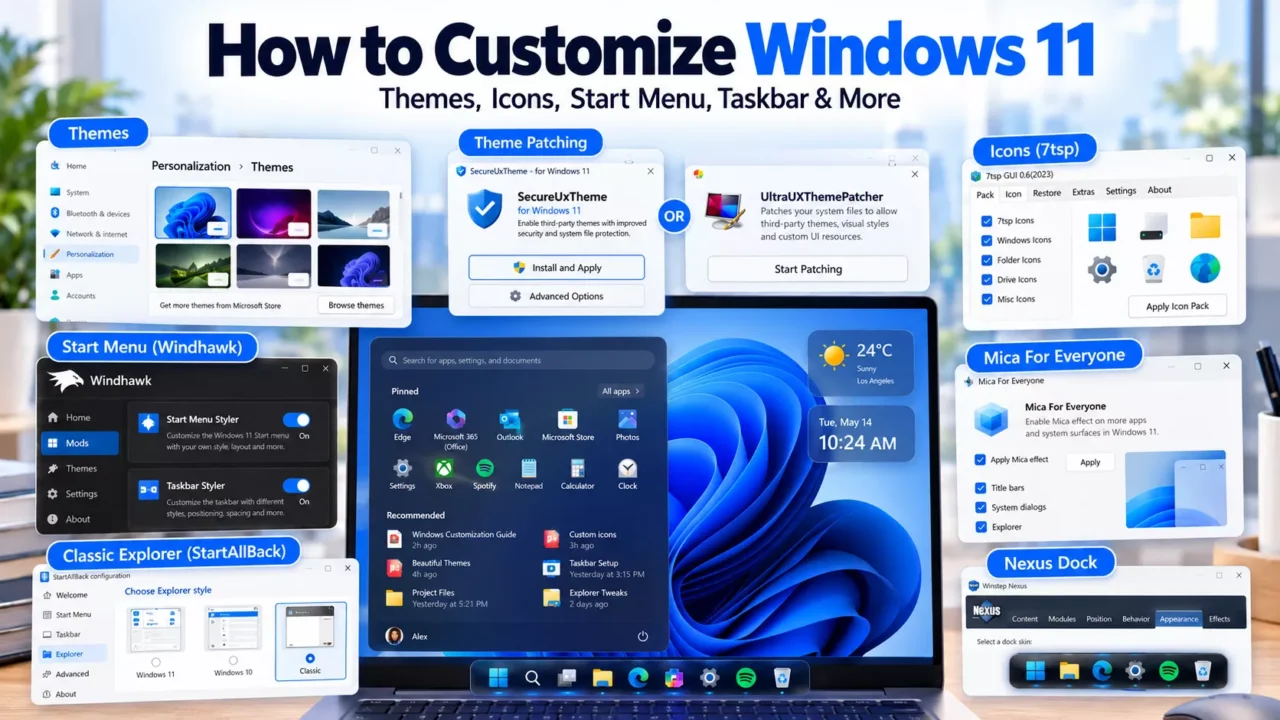
Want to give Windows 11 a completely different look? This beginner-friendly guide explains how to install a third-party Windows 11 theme, bring back the classic File Explorer interface, apply custom icons, personalize the Start menu and taskbar, and add a matching desktop dock.
Follow the steps in order, or jump directly to the feature you want. You don’t need every tool to enjoy a custom desktop: install only the components included with your chosen theme pack.
Before you begin: Check the Windows version supported by your theme and keep its included instructions handy. Press Win + R, type winver, and press Enter to check your Windows 11 version and OS build. A theme designed for one release might look different on another.
What you’ll customize: Visual styles, File Explorer, window effects, system icons, the Start button, taskbar, Nexus Dock, and Windhawk interfaces.
01Create a Restore Point in Windows 11
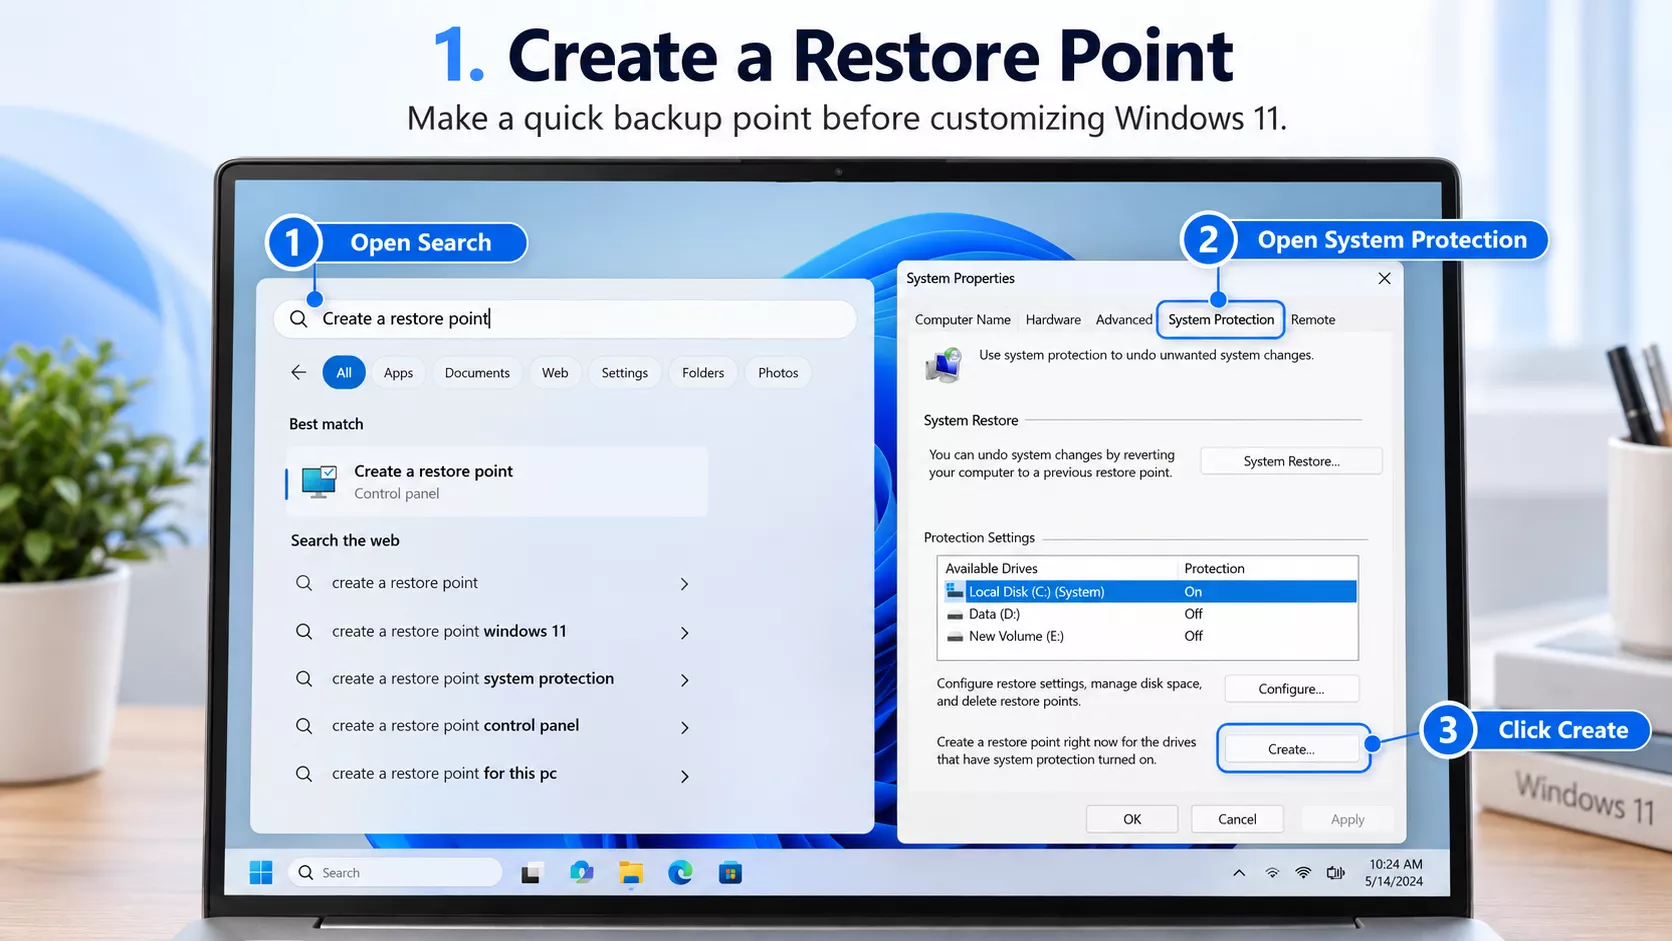
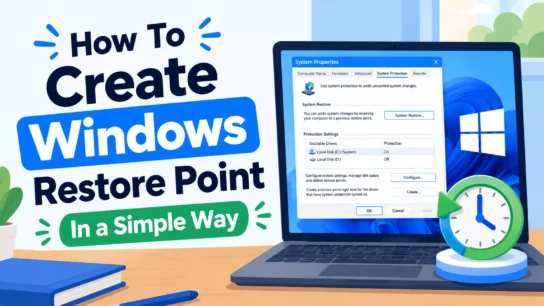
Before applying a new visual style or icon pack, create a restore point. It gives you a convenient way to return to your previous Windows settings if you decide to change your desktop again.
- Open the Start menu and search for Create a restore point.
- Open the result to display the System Protection tab.
- Select your system drive (usually C:). If protection is off, choose Configure, turn on system protection, and confirm.
- Click Create and enter a descriptive name such as Before Windows 11 Customization.
- Click Create again. Once Windows confirms completion, continue to the next step.
02Enable Custom Themes with SecureUxTheme or UltraUXThemePatcher
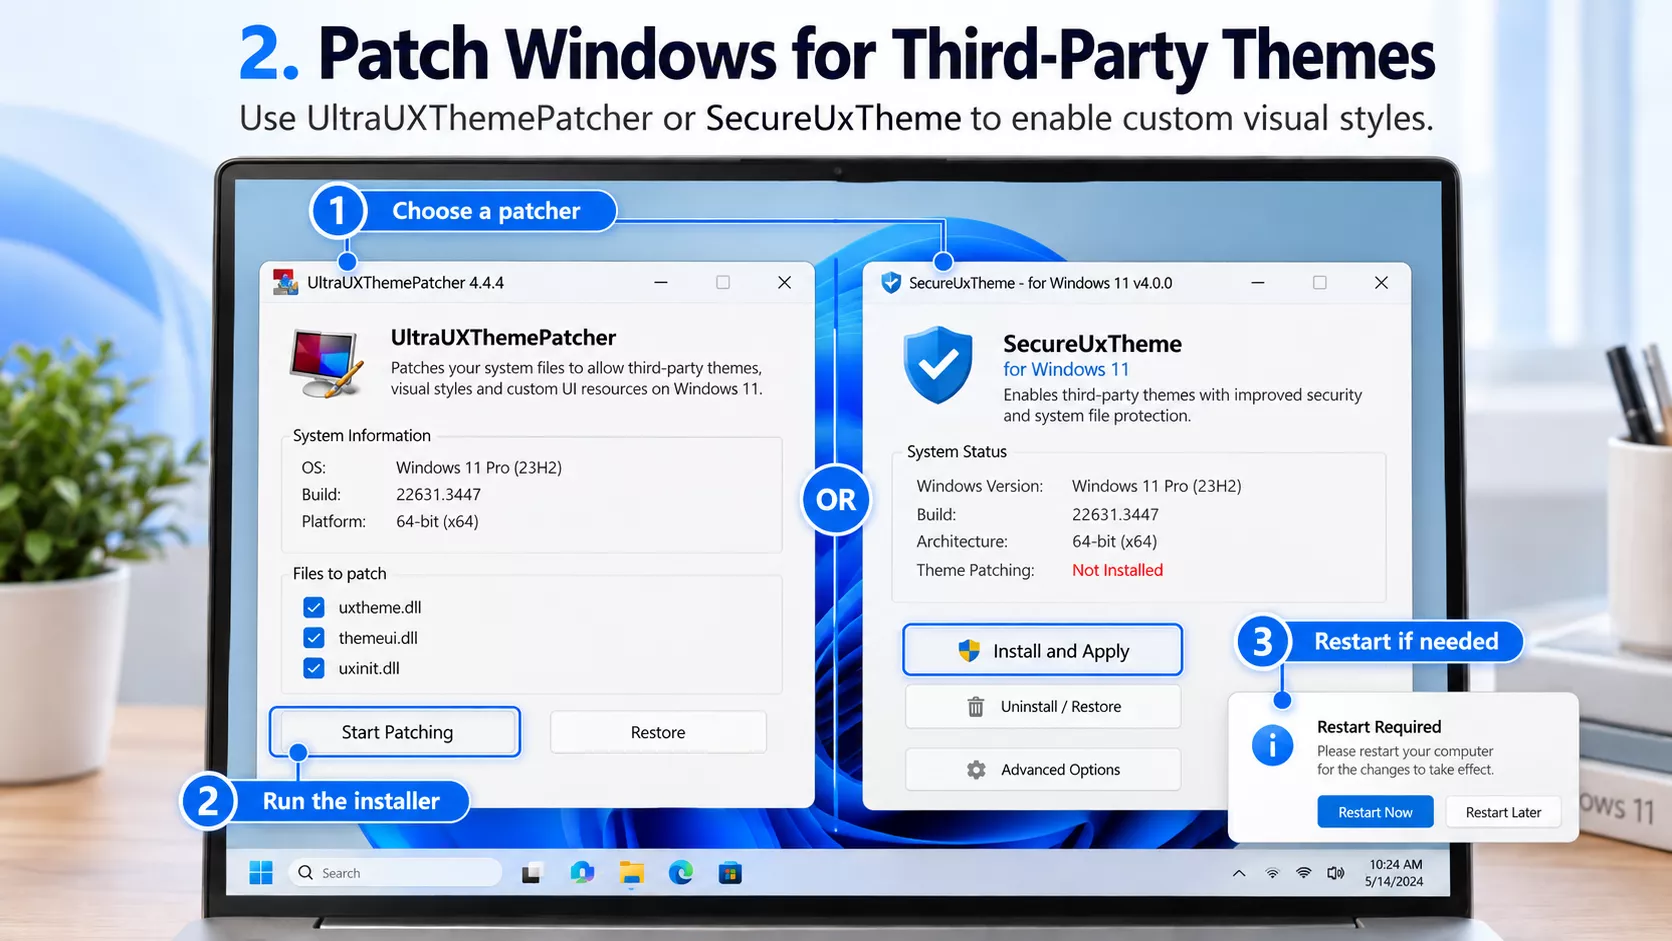
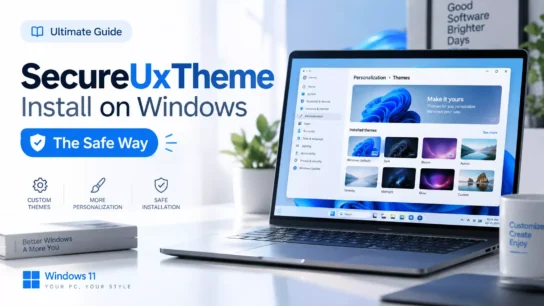
Windows 11 can apply Microsoft’s built-in themes immediately. Custom visual styles, however, may need a theme-enabling tool before they can change the appearance of system windows and controls.
You can use SecureUxTheme or UltraUXThemePatcher. Choose just one, based on the tool’s compatibility notes and the instructions that came with your theme.
Option A: SecureUxTheme
SecureUxTheme supports third-party visual styles without replacing Windows theme DLL files. In version 4, the installer uses an MSI package and the old ThemeTool workflow is no longer required.
- Open the official SecureUxTheme releases page.
- Download the installer that matches your Windows device and run it.
- Complete the on-screen installation and restart Windows if requested.
- Continue to the next section to copy and apply your custom theme through Settings > Personalization > Themes.
.msstyles file. SecureUxTheme v4 does not use that older process.Option B: UltraUXThemePatcher
UltraUXThemePatcher is another established option. It updates the Windows visual-style components and includes an uninstall process for restoring them.
- Download UltraUXThemePatcher from its developer.
- Run the installer and follow its on-screen checks.
- Finish the installation and restart when prompted.
- After restarting, Install the theme files by following Step 3.
Which should you choose? SecureUxTheme is a convenient first option if it supports your Windows version. UltraUXThemePatcher is an alternative for themes and setups that use it. Check your build compatibility first rather than installing both.
03How to Install a Custom Windows 11 Theme
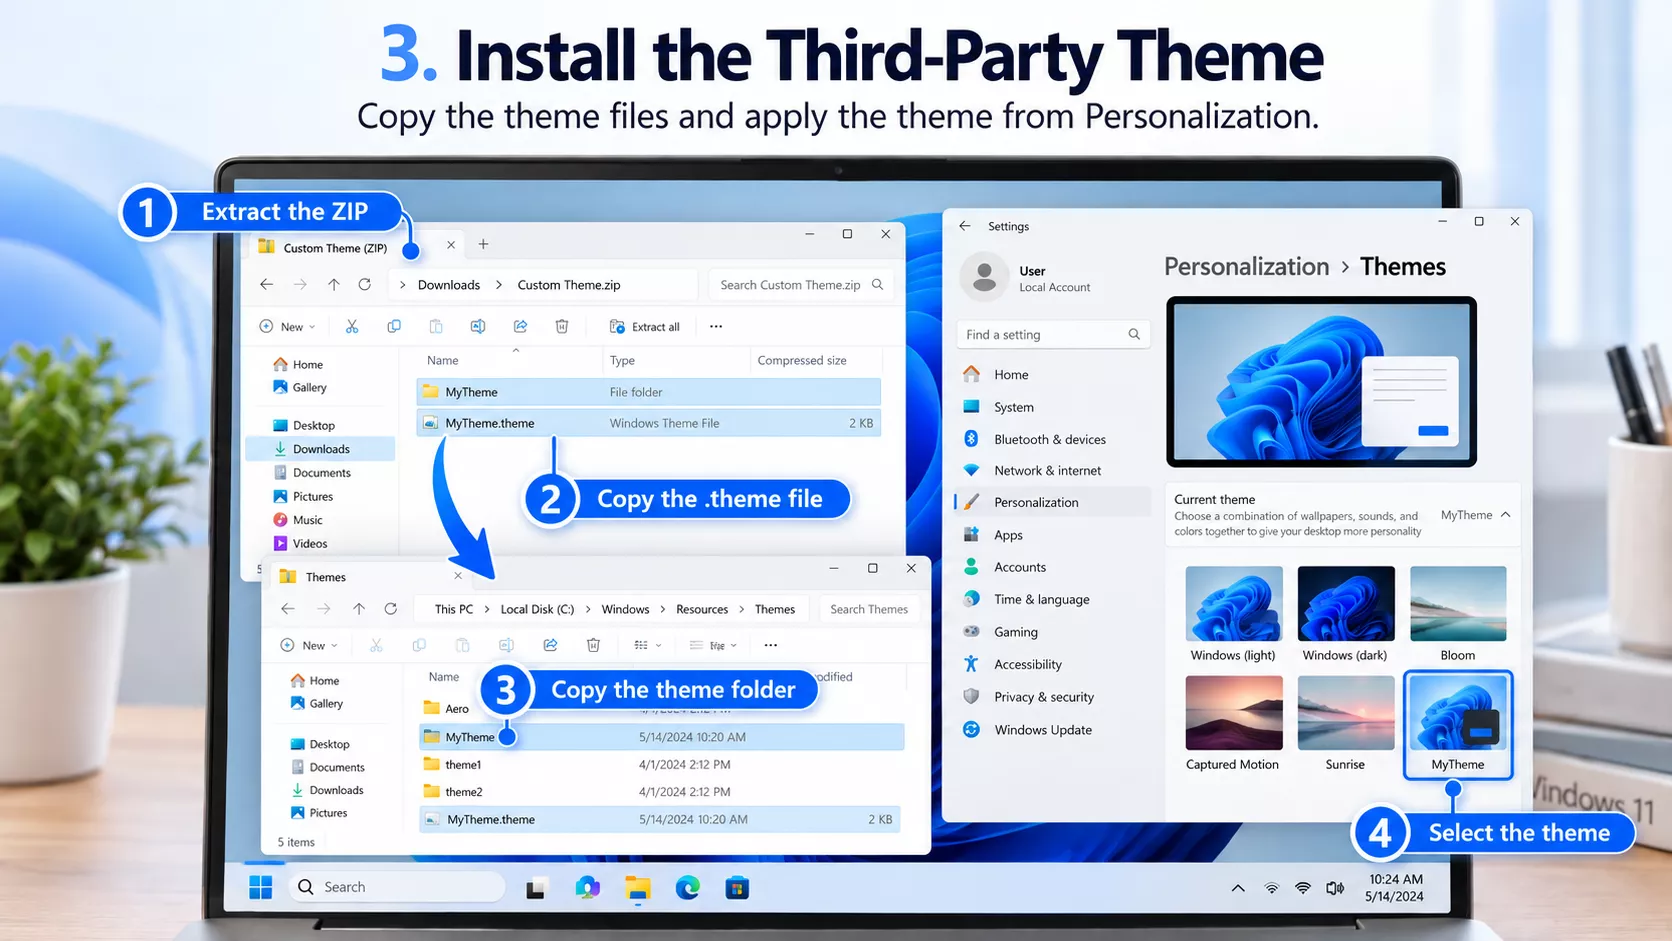
After enabling custom themes, you’re ready to install the visual style. Most Windows 11 theme downloads arrive as a ZIP or other archive containing a .theme file and a matching folder with a .msstyles file.
Extract and copy the theme files
- Download a Windows 11 theme designed for your current Windows build.
- Right-click the downloaded ZIP and choose Extract All, or use your preferred archive extractor.
- Open the extracted folder and find the
.themefile and its matching theme folder. Some downloads include separate light and dark versions. - Press Win + R, paste the folder location below, and press Enter:
C:\Windows\Resources\Themes- Copy the supplied
.themefiles and their matching theme folders into this location. Confirm the administrator prompt if Windows displays one. - Right-click the desktop and select Personalize > Themes, or open Settings > Personalization > Themes.
- Select your newly installed theme. You can switch back to a default Windows theme from the same screen whenever you like.
Example: If a download contains MyTheme.theme and a folder named MyTheme, copy both into the Themes directory. Keep the folder structure supplied by the author.
A Windows visual theme usually changes supported interface controls and colors, but its preview might also show icons, a dock, or a custom Start menu. Those additional features are covered below.
04Get the Classic File Explorer with StartAllBack or a Free Registry Method
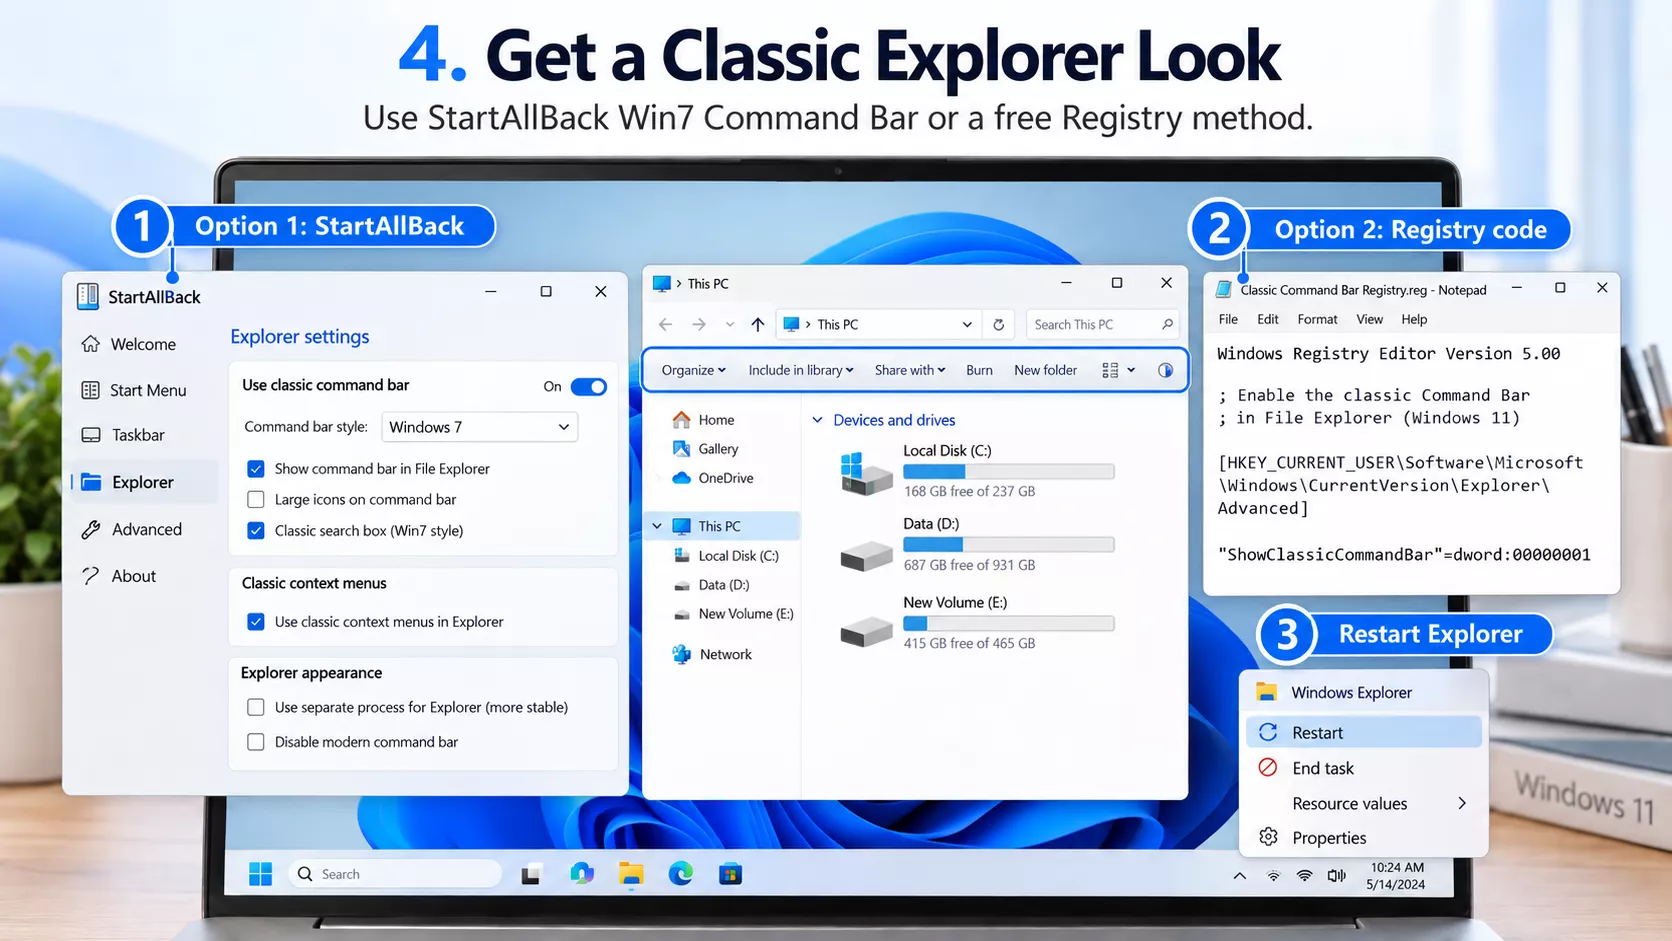
Some Windows 11 visual styles look better with an older File Explorer toolbar. You can choose the Win7 Command Bar in StartAllBack or try the free Registry-based method for Windows builds where it still works.
Option A: Use StartAllBack’s Win7 Command Bar
- Install StartAllBack if you have not already done so.
- Open StartAllBack configuration and choose the Explorer section.
- Find the File Explorer interface-style selector.
- Select Win7 Command Bar. You may also see a Win10 Ribbon UI option, depending on your version.
- Reopen File Explorer to see the updated interface.
Choose the toolbar style that looks best with your theme. The familiar toolbar can help third-party styles blend into File Explorer more consistently.
Option B: Free Registry tweak for classic Explorer
Some Windows 11 releases can display an older Explorer command interface with a small Registry change. This is a legacy tweak, so newer Windows builds may simply keep the modern toolbar.
- Open Command Prompt under your Windows user account.
- Copy the following command, paste it, and press Enter.
reg.exe add "HKCU\Software\Classes\CLSID\{d93ed569-3b3e-4bff-8355-3c44f6a52bb5}\InprocServer32" /f /ve- Restart Windows Explorer from Task Manager, or sign out and sign back in.
- Open File Explorer to check the result.
To return to the original Windows 11 command bar, use:
reg.exe delete "HKCU\Software\Classes\CLSID\{d93ed569-3b3e-4bff-8355-3c44f6a52bb5}" /fThen restart Explorer or sign in again. If the Registry option has no visible effect on your Windows build, you can use StartAllBack or keep the standard Windows 11 Explorer layout.
05Customize Window Effects with Mica For Everyone
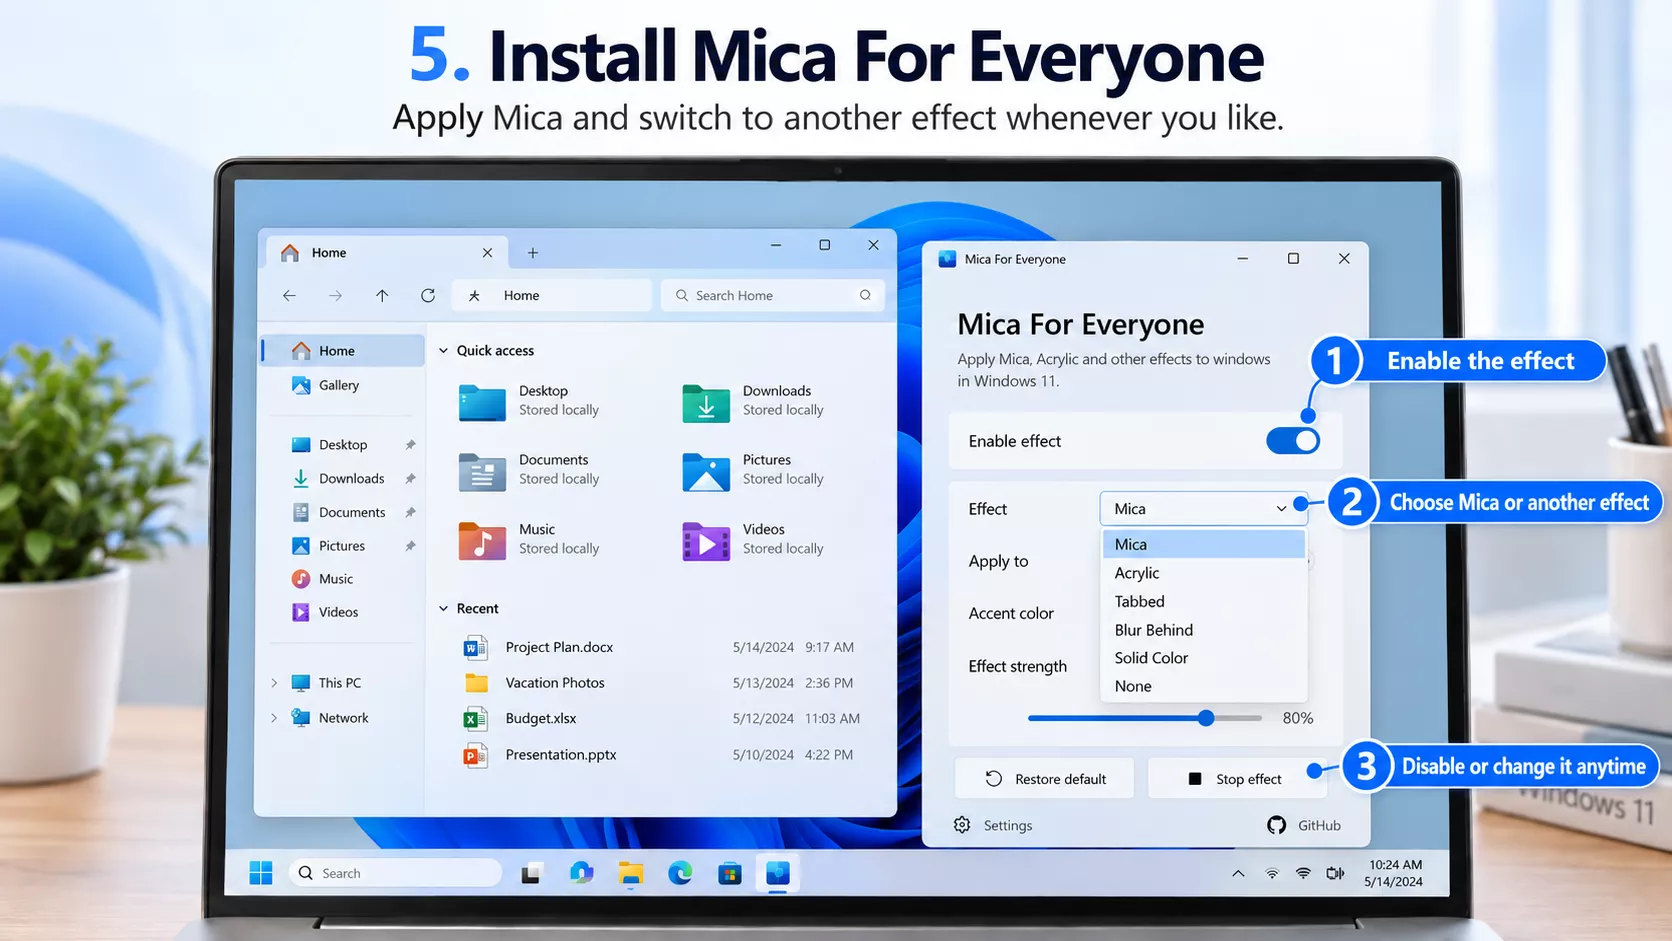
Mica For Everyone lets you adjust backdrop effects on supported application title bars and windows. Depending on your Windows version and the application, you can keep Mica, try Acrylic, select a tabbed-style backdrop, or turn the effect off.
- Visit the Mica For Everyone project page and choose a supported installation method.
- Install and open Mica For Everyone.
- Select the Global rule or an individual application rule, if offered in your version.
- Find Backdrop or Backdrop Type and choose the appearance you prefer.
- Apply the settings and reopen the affected app if needed.
| Backdrop option | What it does |
|---|---|
| Default | Lets Windows or the application decide the appearance. |
| None | Requests no system backdrop effect for the selected rule. |
| Mica | Uses a subtle, wallpaper-inspired material where supported. |
| Acrylic | Uses a translucent, frosted-glass appearance where supported. |
| Tabbed | Uses an alternative Windows backdrop style where supported. |
To disable the added Mica effect: choose Default to stop overriding the app’s own background, or None when you specifically want to request no backdrop. Available options depend on Windows and the selected app.
Design tip: If a theme already includes glass effects, start with Default and add effects only where you want them. This keeps the desktop appearance consistent.
06How to Install 7tsp Icon Packs on Windows 11
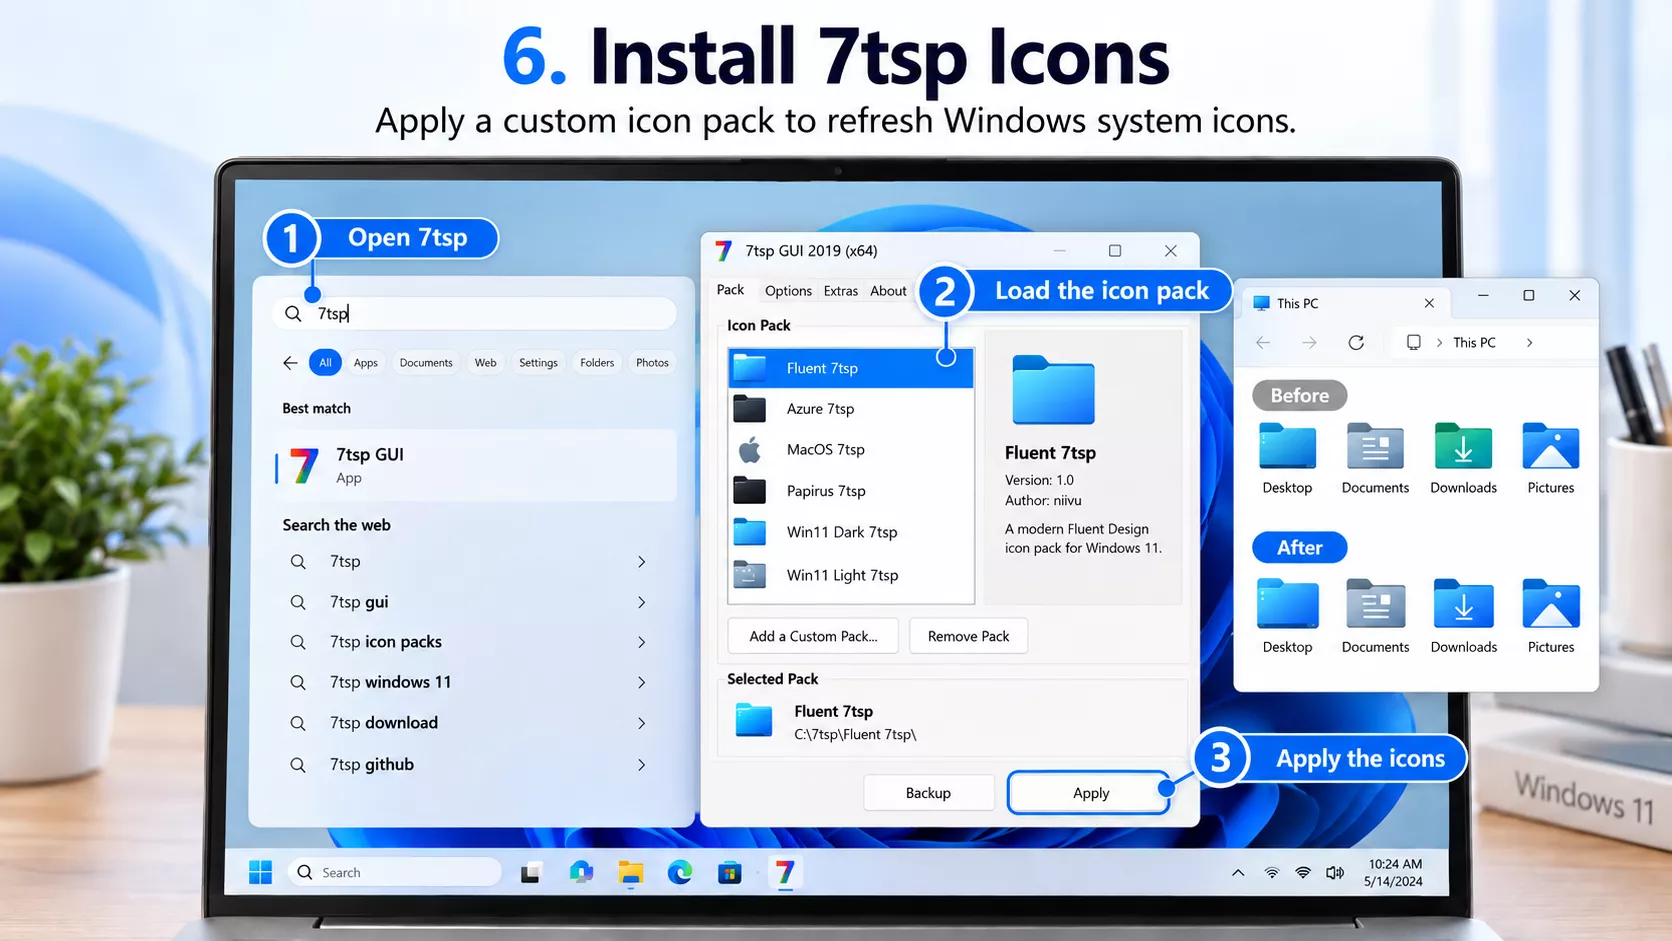
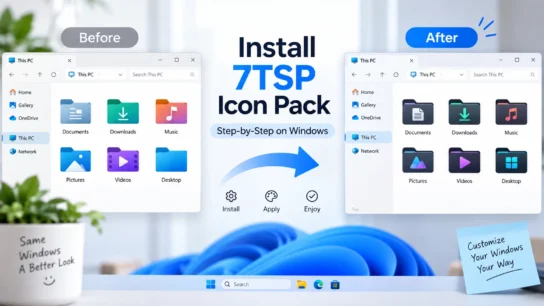
A 7tsp icon pack can refresh familiar Windows icons such as folders, drives, and system shortcuts. Many theme creators offer matching 7tsp packs to help every part of the desktop share the same design.
- Download your preferred and suitable 7tsp icon pack.
- Get the 7tsp GUI Tool, and extract the application archive then run it.
- Open the 7tsp application and select Add a Custom Pack.
- Browse to the compatible icon-pack archive. Some packages include a naming or file-extension instruction; follow the pack creator’s directions.
- Click Start Patching and follow the on-screen prompts.
- After installation finishes, restart the Windows.
If your pack offers a light version, dark version, or several folder colors, choose the one that best matches your Windows 11 theme.
For a new icon set, use the patcher’s restore or backup option before applying a different pack. This helps prevent mixing icons from two styles.
07Install Windhawk Resource Redirect Icon on Windows 11
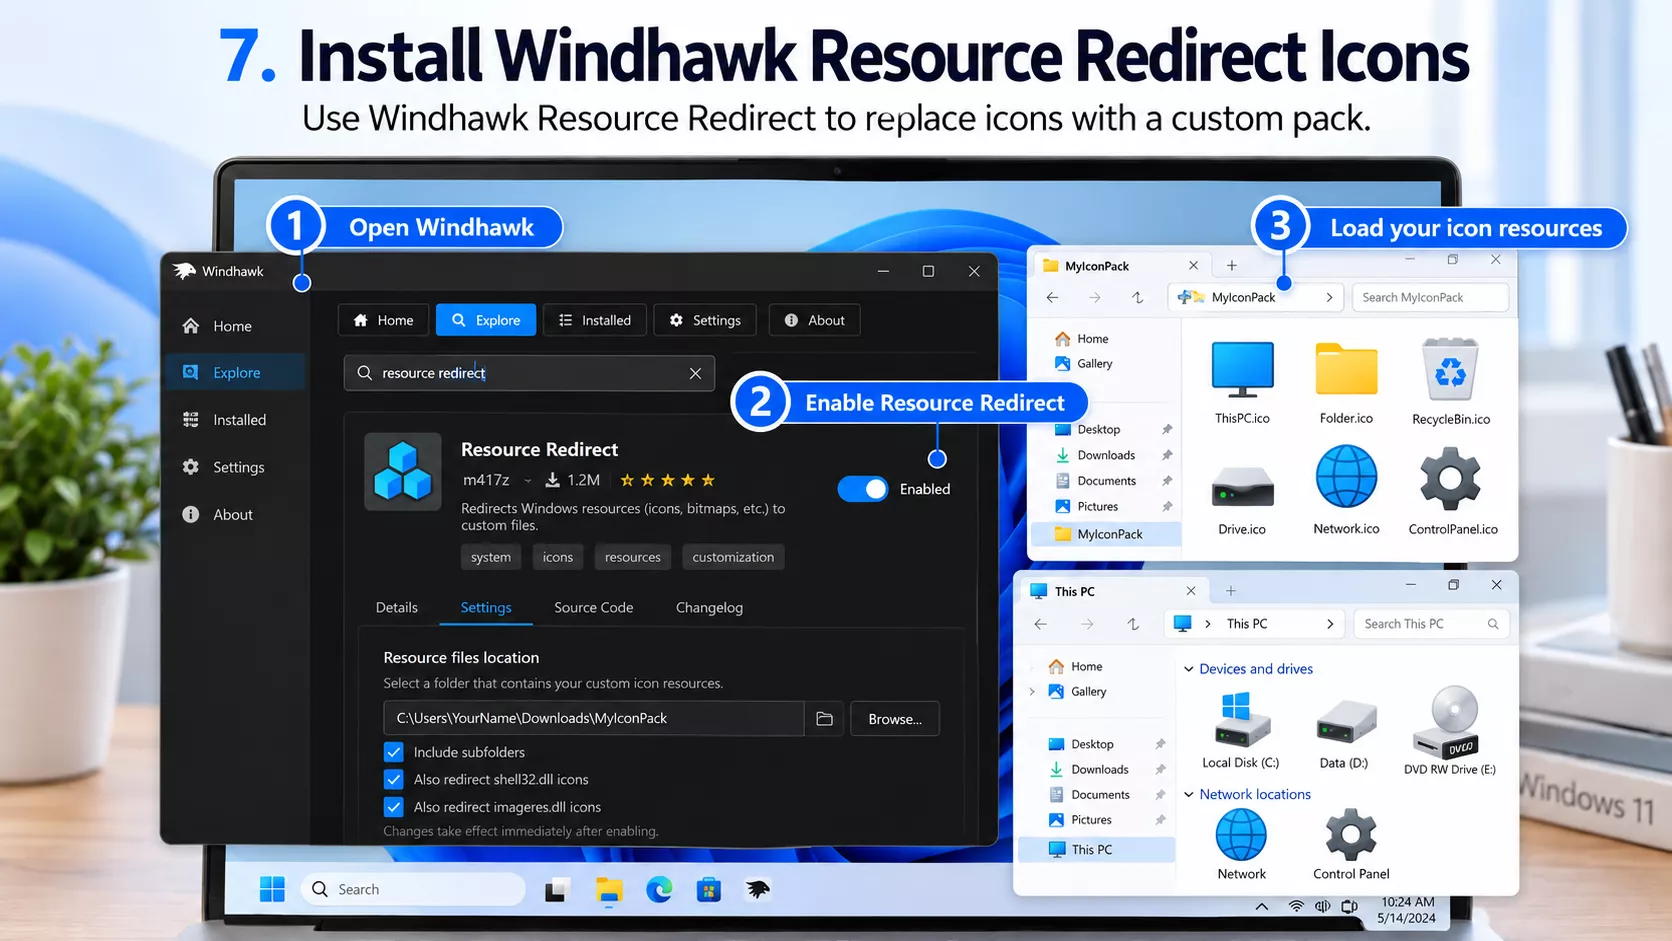
Resource Redirect is a Windhawk mod that loads alternative icon resources without directly replacing the original Windows system files. It is a useful way to apply matching Windows 11 folder and system icon themes.
Install Resource Redirect
- Download and install Windhawk.
- Open Windhawk and select Explore or Mods, depending on the app version.
- Search for Resource Redirect and open its mod page.
- Click Install, then open the mod’s Settings.
- Select one of the available icon themes and save your choice.
Apply a downloaded icon theme manually
- Download a Icon theme built specifically for Resource Redirect and extract it.
- Keep its resource files and
theme.initogether in the supplied folder. - Copy the full path to that folder.
- Open the Resource Redirect settings in Windhawk and enter the theme path as directed. If you used Copy as path, remove surrounding quote marks where required.
- Click Save and refresh the icon cache if the mod requests it.
Some folders show thumbnail previews instead of plain icons. If these do not change, check the mod’s folder thumbnail options and the theme author’s recommendations.
Which icon method is best? 7tsp and Resource Redirect are alternative ways to style system icons. For the cleanest result, begin with one method rather than applying both to the same icon set.
08Customize the Start Menu, Taskbar, Visual Style and Start Button with StartAllBack
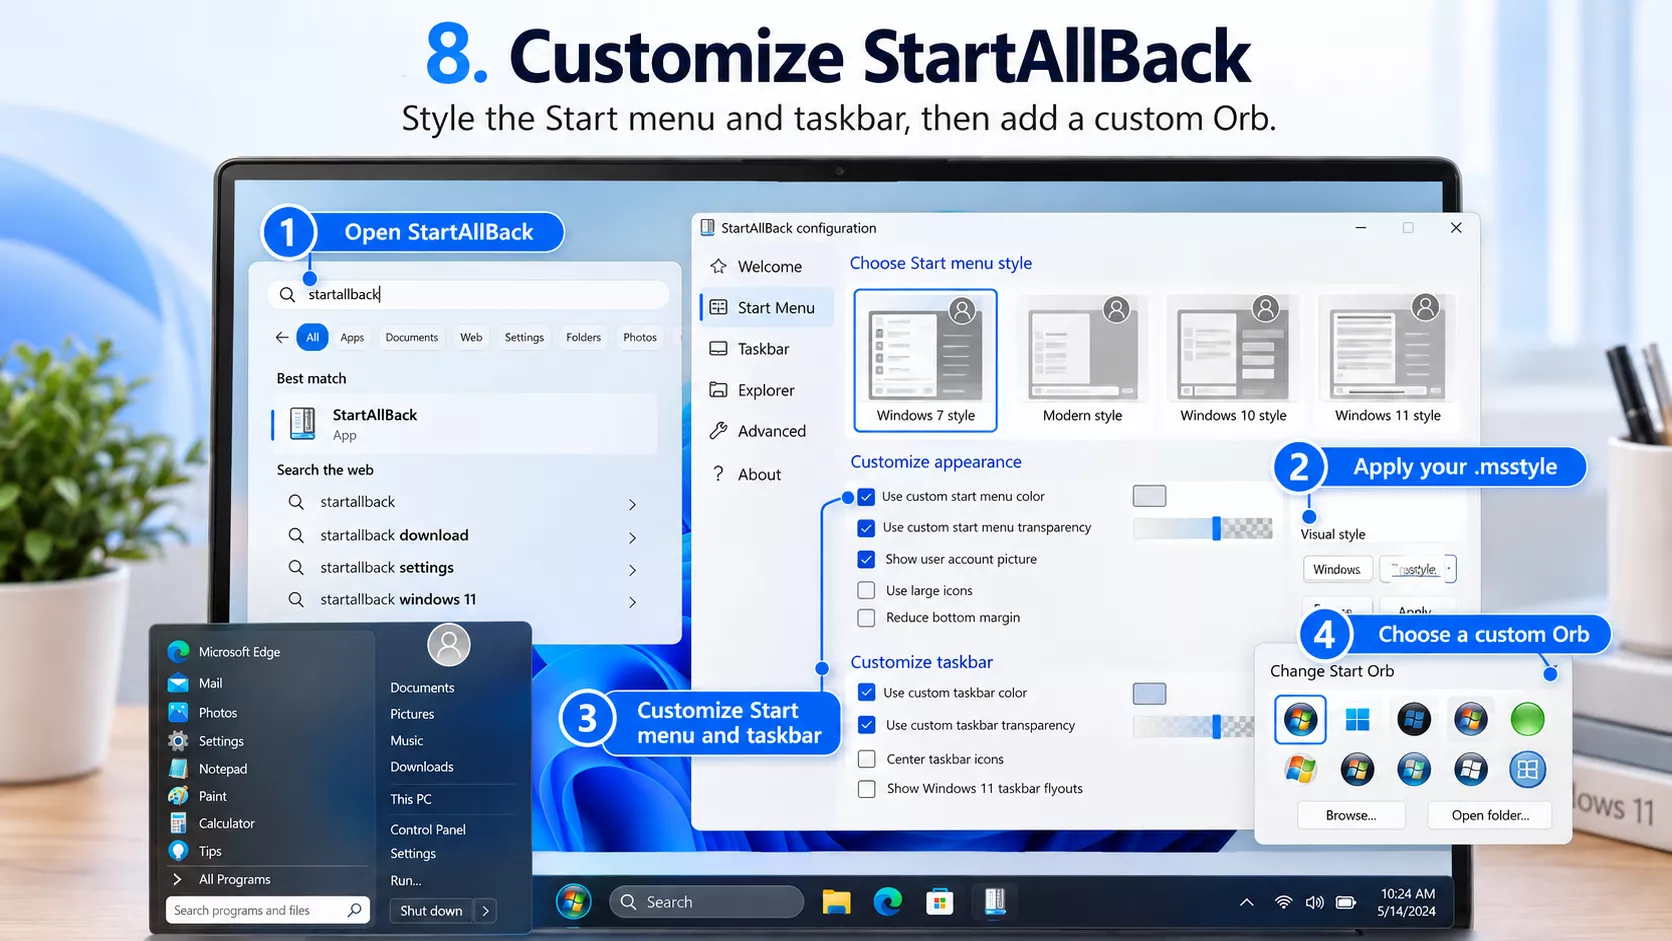
StartAllBack offers familiar controls for changing the Windows 11 Start menu, taskbar, File Explorer, and Start button. It can also use compatible .msstyles resources for supported Start menu and taskbar appearances.
Install and configure StartAllBack
- Download the current version from the official StartAllBack website and install it.
- Open StartAllBack configuration. Right-click on the taskbar and click Properties.
- Use the Start Menu section to choose your layout and adjust menu behavior.
- Use Taskbar to adjust taskbar styling, icon size, grouping, and Taskbar position as available in your version.
Apply a custom StartAllBack visual style (.msstyles)
Some Windows 11 theme packs include a separate StartAllBack style. This is different from the main Windows theme file installed in Step 3.
- Find the StartAllBack-compatible
.msstylesfile included with your downloaded theme. - Open the StartAllBack styles folder if your installation uses one. A common location is:
%LOCALAPPDATA%\StartAllBack\Styles - Copy the provided style files into the matching Styles folder, preserving the layout given by the theme creator.
- Open StartAllBack’s Start Menu and Taskbar sections and select your preferred style via Visual Style
- Apply the style and check the Start menu and taskbar appearance.
.msstyles file used by a Windows visual theme is not automatically a StartAllBack taskbar or Start menu style. Use a file specifically marked as compatible with StartAllBack.Change the Windows Start button with a custom Orb
A Start Orb is a custom Start button image. Theme creators often include one that matches the colors and shapes of their visual style.
- Download a Start Orb designed for StartAllBack, or locate the Orb included with your theme.
- Open StartAllBack and look for the Start button or Orb image option.
- Select the Orb file. If your version uses a local Orbs folder, a common location is
%LOCALAPPDATA%\StartAllBack\Orbs. - Apply the selection and check its appearance on the taskbar.
If an image is reported as an invalid Orb, use a StartAllBack-compatible Start button image supplied by the creator; a regular PNG logo is not always the same thing.
09Install Winstep Nexus Dock, Custom Dock Skins and Indicators
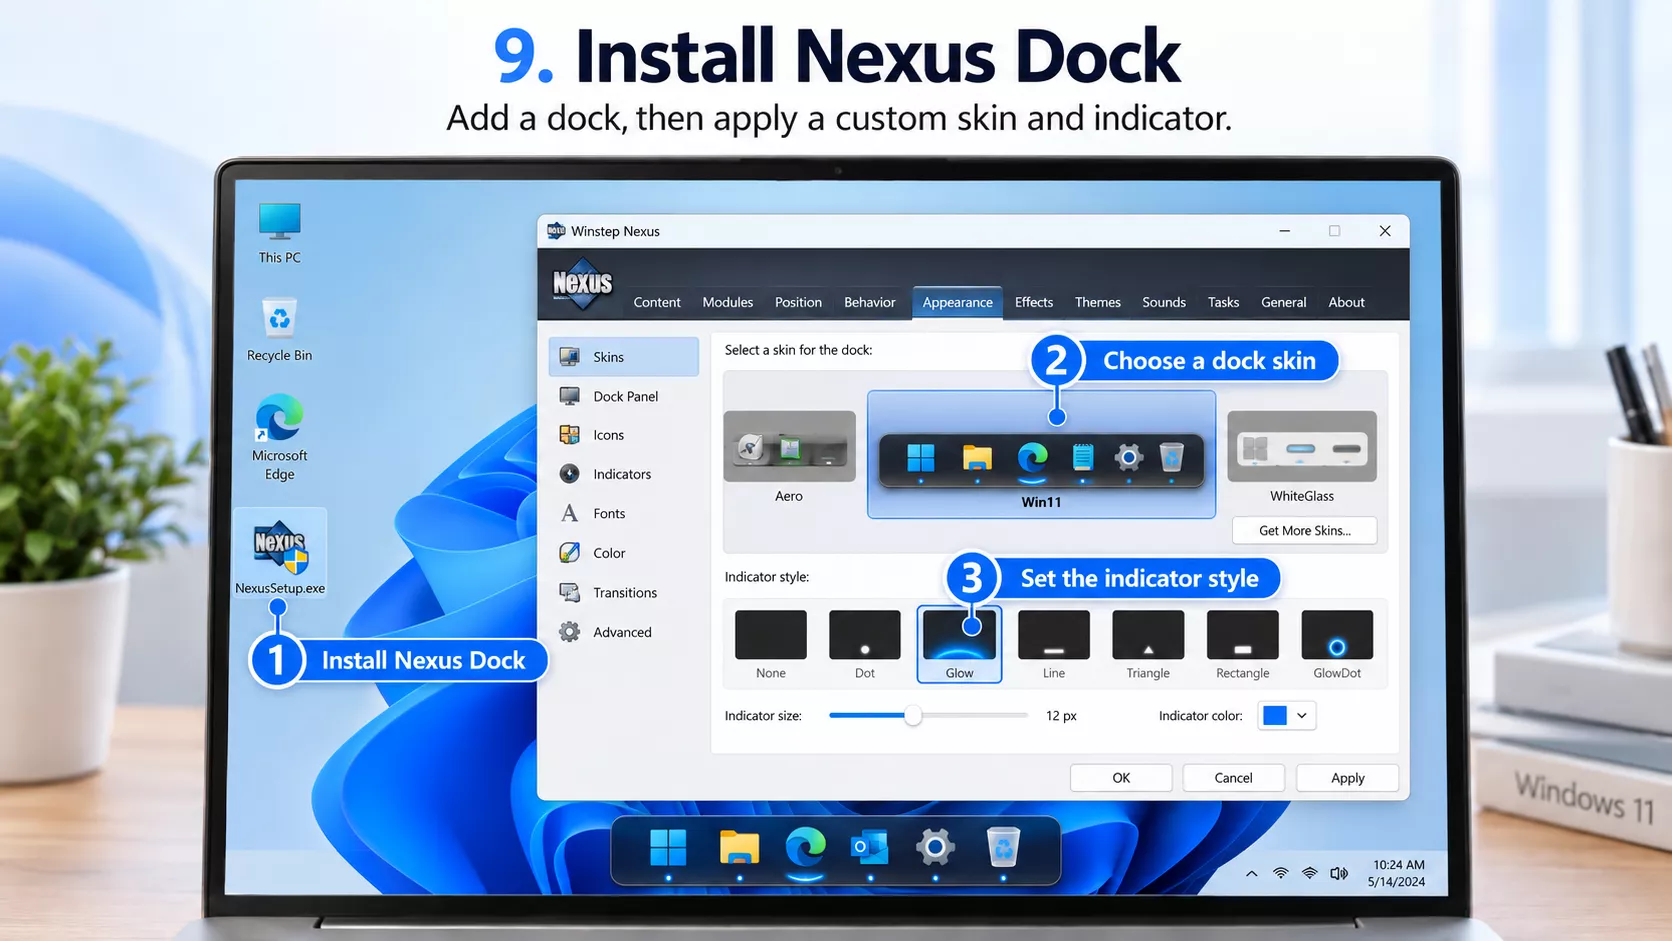
Winstep Nexus Dock is a customizable application launcher that lets you add shortcuts, use dock themes, change icons, and select indicators for running programs. It’s an easy way to finish a Windows 11 desktop makeover.
Install and arrange Nexus Dock
- Download and install Winstep Nexus Dock.
- Open Nexus and then Preferences.
- Choose the dock’s screen position under Position.
- Drag your favorite application shortcuts onto the dock to build your layout.
- Adjust icon size, spacing, and effects under Appearance and Effects.
Apply a custom Nexus dock skin
- Download a Nexus-compatible dock skin or theme.
- Go to Nexus Preferences > Themes.
- Click Import and select the downloaded skin ZIP, if provided in a supported format.
- Select the new dock background or theme from the available list.
Some theme packs arrive as folders rather than a directly importable ZIP. Follow the creator’s packaging instructions if Nexus does not recognize the file immediately.
Install a custom running indicator
Running indicators are small marks that show which dock apps are currently open. You can change them to match your dock skin.
- Open Nexus Preferences > Appearance.
- Locate the Running Indicator selector.
- Choose a built-in indicator, or select Open Folder to access the indicator location.
- Copy your compatible custom indicator image into that folder and select it in Nexus.
- Adjust the indicator’s position if the skin needs a little alignment.
If you’re doing a more in-depth customization, the Nexus Official Guide will help you with the Nexus user guide and appearance settings.
10Customize Windows 11 with Windhawk: Start Menu, Taskbar and Notification Center
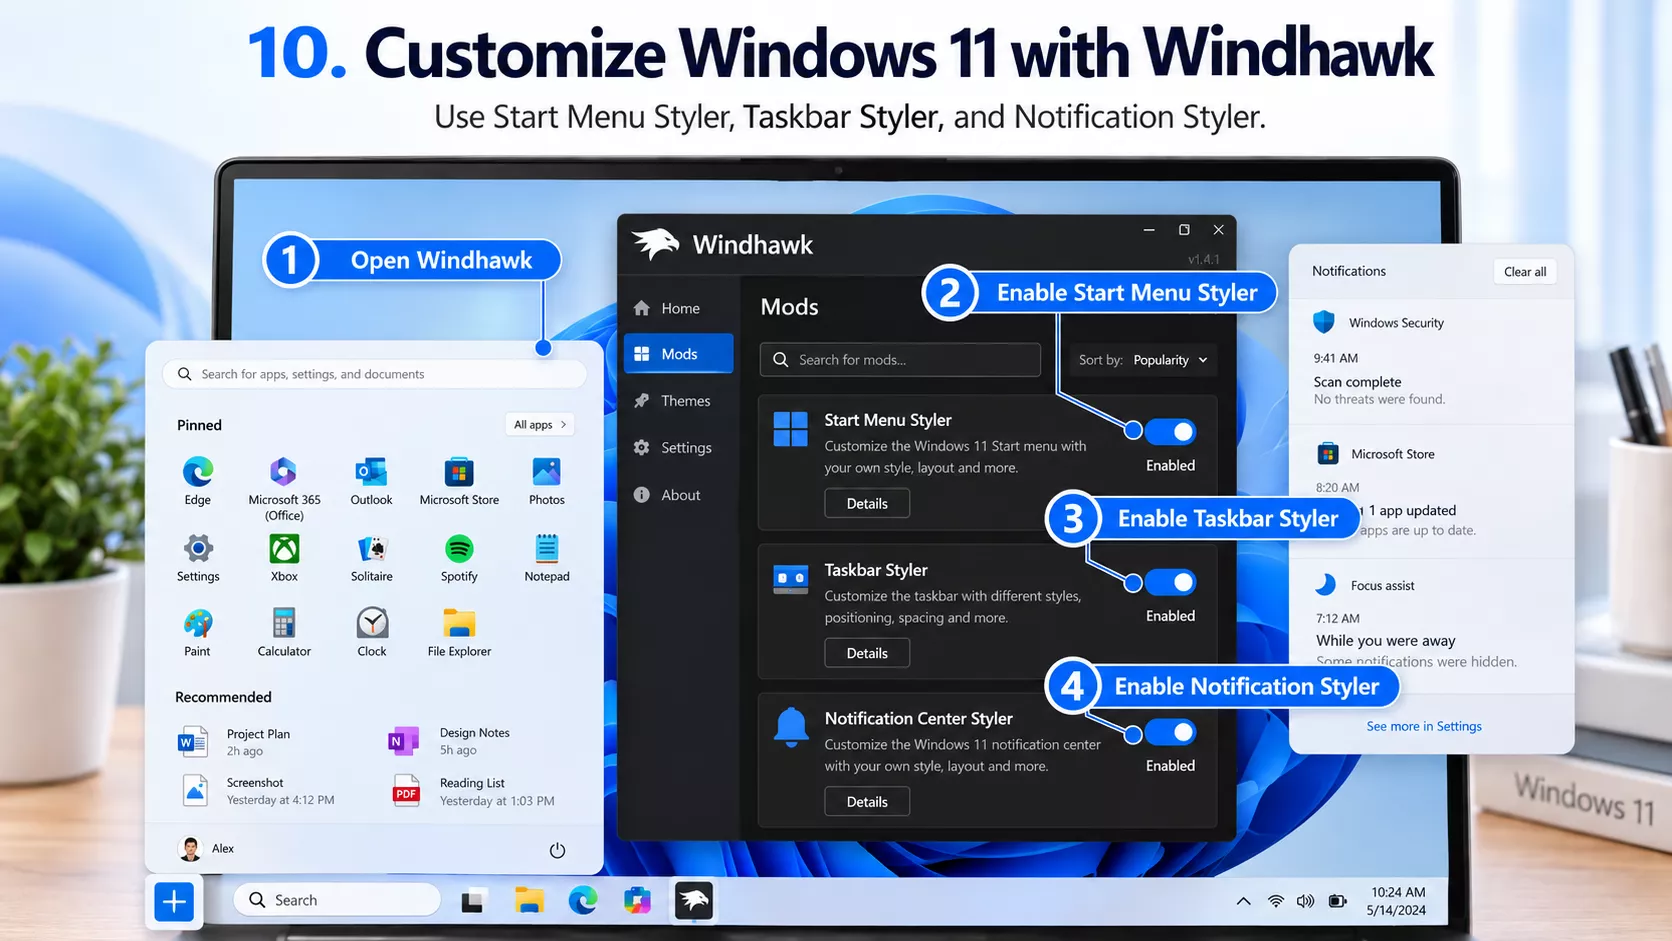
Windhawk makes it easy to install individual mods for specific Windows 11 interface elements. You can pick a ready-made style or use a configuration supplied by a theme creator.
If you installed Windhawk in Step 7, you can go straight to its mod catalog. Otherwise, download it from windhawk.net and install it first.
10.1 Windows 11 Start Menu Styler
Windows 11 Start Menu Styler changes the appearance of the Start menu using built-in or community-created styling presets.
- In Windhawk, open Explore and search for Windows 11 Start Menu Styler.
- Install the mod and open Settings.
- Choose a theme from the available presets, or add the custom settings from your theme creator.
- Save your changes, then open the Start menu to preview the result.
You can experiment with layout, background, spacing, and other visual details supported by your chosen preset.
10.2 Windows 11 Taskbar Styler
Windows 11 Taskbar Styler lets you change the taskbar’s look, from subtle transparency to a more distinctive dock-like design.
- In Windhawk, search for Windows 11 Taskbar Styler and install it.
- Open Settings and select one of the supplied themes or configurations.
- Save the settings and check the taskbar appearance.
- Try a different preset if you want a simpler or more transparent design.
Useful tip: If StartAllBack is already styling your taskbar, use the Windhawk taskbar mod only for changes that work with your setup. Two tools changing the same taskbar elements can produce mixed results.
10.3 Windows 11 Notification Center Styler
Windows 11 Notification Center Styler adds design options for the Notification Center and related system panels, helping those areas match your custom desktop theme.
- In Windhawk, search for Windows 11 Notification Center Styler.
- Install the mod and open its Settings.
- Select a theme preset, or apply a compatible configuration from your downloaded theme pack.
- Save and reopen the Notification Center or Quick Settings to see the result where supported.
Windhawk mods are independent, so you can enable only the ones that match your design. For example, you might use StartAllBack for your Start menu and Windhawk only for Notification Center styling.
Make Everything Match: A Quick Finishing Checklist
Your Windows 11 customization is nearly complete. A few small adjustments can make all the elements feel like one cohesive theme.
- Visual theme: Select the correct light or dark variant in Windows Personalization.
- Explorer: Choose the toolbar that works best with the theme’s visual style.
- Icons: Use one matching icon set through 7tsp or Resource Redirect.
- Start menu and taskbar: Keep the colors, transparency, and button style consistent.
- Dock: Match its skin, icon set, and running indicator.
- Background: Apply the wallpaper supplied with your theme or a coordinating image.
You can return to any section whenever you want to try another design. The best Windows 11 setup is simply the one that looks good and works comfortably for you.
Windows 11 Customization: Common Questions and Quick Fixes
The Windows 11 theme is not showing in Personalization
Check that the .theme file and its matching folder are both in C:\Windows\Resources\Themes. Verify the theme’s Windows build requirements and that your chosen theme-enabling tool is installed.
File Explorer still looks like the default Windows 11 version
Try reopening Explorer and checking the selected StartAllBack Explorer style. The free Registry method may not take effect on newer Windows versions, so it is fine to use the built-in Explorer or a supported StartAllBack option instead.
Some folder icons did not change
Make sure the icon pack matches your Windows build. For Resource Redirect, check folder-thumbnail settings and refresh the icon cache if the mod recommends it.
My StartAllBack Orb does not appear
Check that the file is a StartAllBack-compatible Orb rather than an ordinary image. Re-select it from the StartAllBack settings and review the chosen Start button style.
Windhawk styling does not look like the preview
Check the mod’s compatibility notes, verify its preset or custom settings, and see whether another tool is styling the same Windows element. A simple preset is a good starting point.
How do I switch back to the standard Windows 11 appearance?
Choose a built-in theme under Settings > Personalization > Themes. You can then disable any Windhawk mods, change StartAllBack appearance settings, restore icons through the icon tool, and uninstall optional customization tools you no longer use.
Frequently Asked Questions
Do I need every tool in this guide to install a Windows 11 theme?
No. The visual theme and a compatible theme-enabling method are the main components. Everything else—custom icons, docks, Orbs, and Windhawk styling—is optional.
Should I install UltraUXThemePatcher and SecureUxTheme together?
Choose one compatible tool. Each enables third-party visual themes in a different way, so there is no need to install both for the same setup.
Can I install Windows 11 icon packs without 7tsp?
Yes. Windhawk’s Resource Redirect mod can use compatible icon themes without directly replacing the original Windows system resources.
Can I use StartAllBack and Windhawk together?
Yes, for different interface elements. For example, StartAllBack can style Explorer while Windhawk handles Notification Center. For areas controlled by both tools, test one styling method at a time.
How do I get the old File Explorer toolbar on Windows 11?
StartAllBack’s Win7 Command Bar is one option. A free Registry command-bar tweak exists for older compatible Windows 11 builds, but it may not change the interface on newer releases.
Can I turn off Mica without removing the theme?
Yes. In Mica For Everyone, set the backdrop to Default to leave the choice to the app or Windows, or choose None where supported to request no backdrop effect.
Can I change the Windows 11 Start button to a custom Orb?
Yes. StartAllBack supports custom Start button images when they use a compatible Orb format.
Can I change my theme again later?
Absolutely. Choose a new compatible theme in Personalization, and swap the matching optional parts—icons, dock skin, Start button, and Windhawk presets—whenever you like.
Final thought:
Windows 11 customization is about making your desktop feel personal. Start with the visual theme, choose the extras you like, and build a coordinated setup at your own pace.
Tool options and Windows interface behavior can change with updates. Check the latest release notes and the requirements included with each theme before installing a new version.